How to Start a Blog in 2025 (Step-by-Step Guide for Beginners)
Our readers always come first
The content on DollarSprout includes links to our advertising partners. When you read our content and click on one of our partners’ links, and then decide to complete an offer — whether it’s downloading an app, opening an account, or some other action — we may earn a commission from that advertiser, at no extra cost to you.
Our ultimate goal is to educate and inform, not lure you into signing up for certain offers. Compensation from our partners may impact what products we cover and where they appear on the site, but does not have any impact on the objectivity of our reviews or advice.
Starting a blog to make money requires a bit more setup and planning than starting a blog as a hobby. This tutorial shows you how to set up your blog, design it with a theme, optimize your site, and write your first blog post.
Our mission at DollarSprout is to help readers improve their financial lives, and we regularly partner with companies that share that same vision. If a purchase or signup is made through one of our Partners’ links, we may receive compensation for the referral. Learn more here.

Starting a blog was one of the best decisions I ever made.
Before starting my blog, I was burned out, working 60+ hours a week at a job I didn’t like where I felt unfulfilled (and was certainly underpaid).
I didn’t have time for myself, let alone my family, friends, or any semblance of a social life.
By the time the workday ended, I was so drained that all I wanted to do was zone out in front of the TV for a couple of hours and then head to bed.
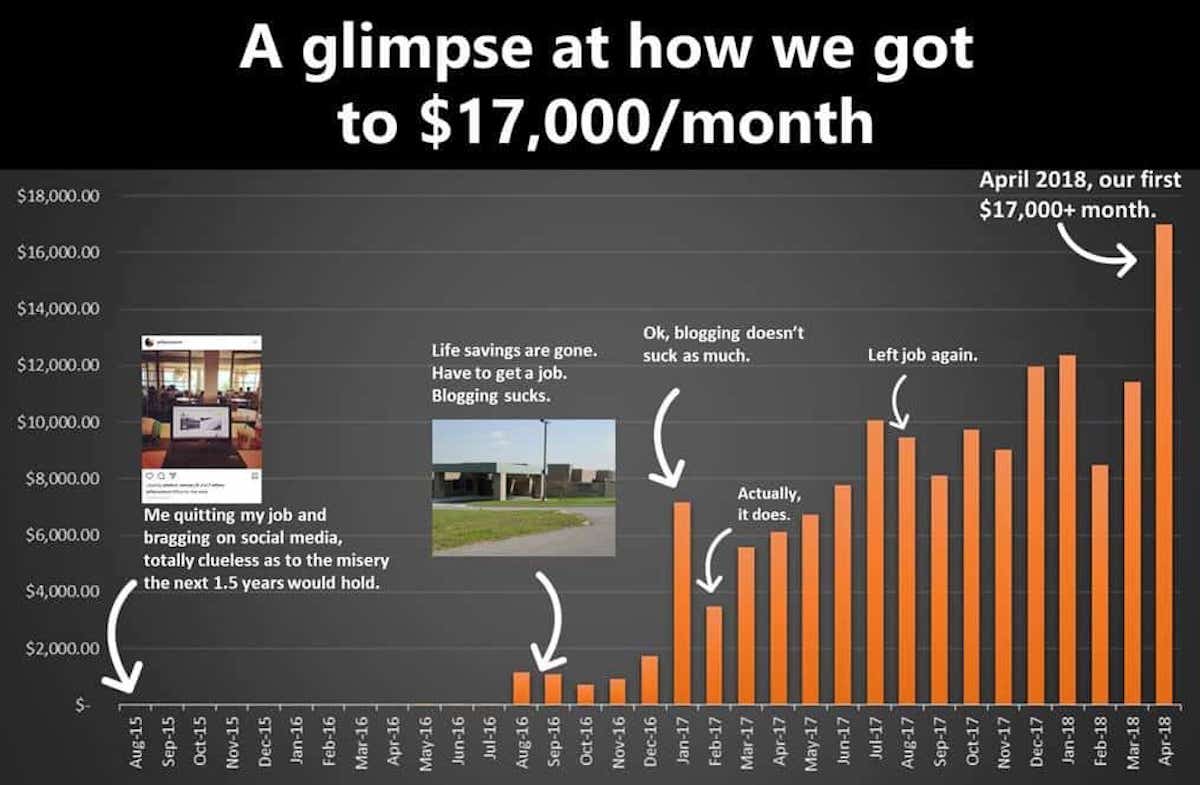
As cliche as it sounds, blogging changed my life. It’s allowed me to work from home (or anywhere I want), take time off whenever I need to (no permission required), and make money even when I’m not working. If that’s not the dream, I don’t know what is.
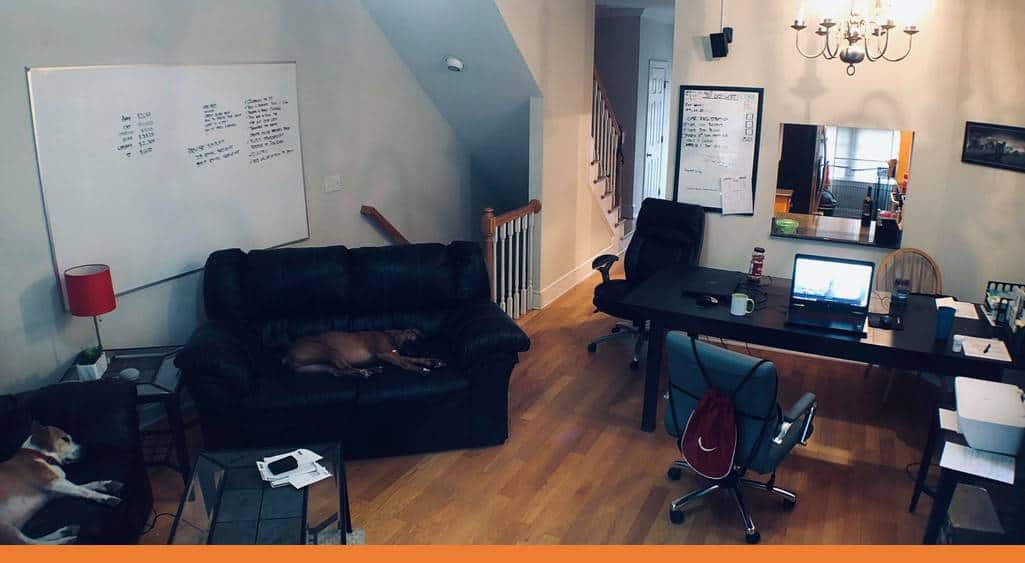
And that’s the reason I’m writing this article. If you have a similar dream — a dream of spending more time with your family, of traveling whenever and wherever you want, or of making more money while working less — then this tutorial is for you.
I’m going to show you not only how to start a blog, but how to set your blog up for success from day one.
Before You Begin
Blogging is undoubtedly a realistic way to make money online. But that doesn’t mean it’s for everyone. Here’s what you should consider before getting started.
How to Start a Blog in 5 Easy Steps
Starting a blog isn’t hard. You can set up your hosting and have your website into the world in a matter of minutes. But you’re not just here to start any blog. You’re here to make money with a blog. And that requires a bit more setup and planning.
Which is why we’ve included not just how to start your blog, but also how to design your blog using a theme, how to optimize your new blog with free plugins, and how to decide what blog posts to write first.
1. Choose a name and host.
Your first step in starting a blog is to choose your niche (if you haven’t already), blog name, and a hosting provider.
Find a profitable niche.
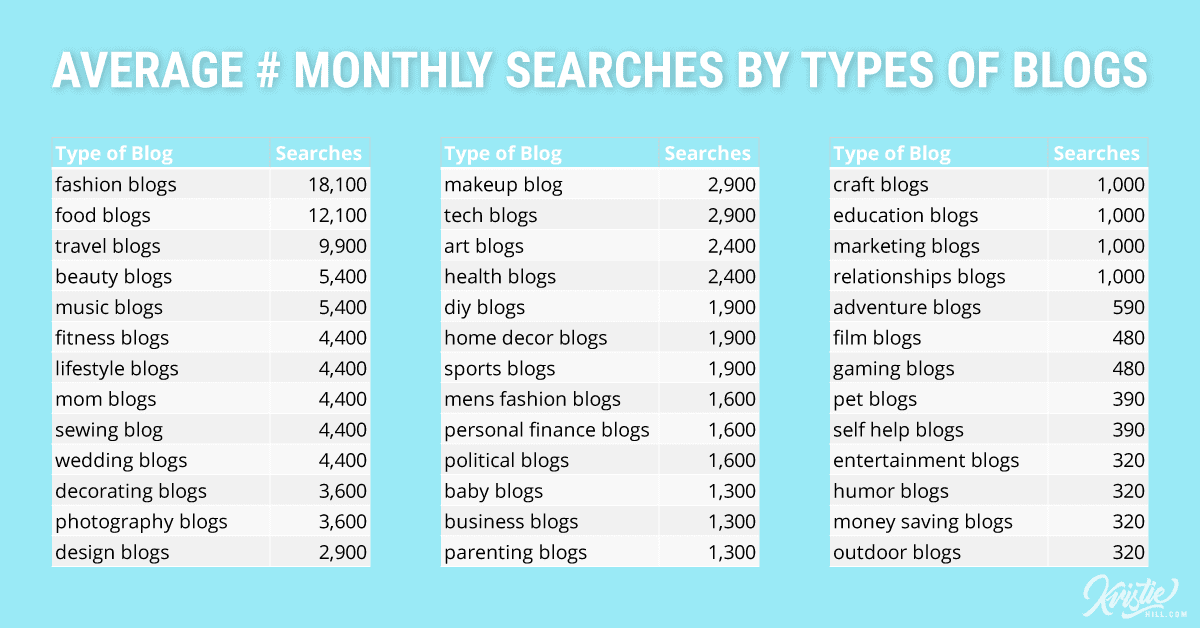
Your niche is just the overall market category of your blog. Some profitable blog niches include:
- Personal finance
- Health and fitness
- Beauty and fashion
- Business
- Personal development
Ideally, your niche should be a topic that:
- You know well and/or
- Are interested in AND
- Something that other people care about
- If you can capture all three, you’ve found a profitable niche.
Select a domain name.
Once you have your overall niche, the next step is to choose your blog name (AKA domain name/URL). Your domain name is an important part of your blog for three reasons:
- It’s your first impression. When a user sees your content on social media or comes to your website, one of the first things they’ll notice is your URL. It should give them a general idea of what you can help them with.
- It’s part of your brand. A good domain name can help you stand out from competitors in your niche and make your brand more memorable. It can also showcase your personality and let users know what to expect from your content.
- It affects your SEO. It’s not necessary, but it can help to have a relevant keyword or two in your domain. For example, if you’re starting a fitness blog, then you might consider having “fitness” in your domain name. This helps search engines better understand what your site is about.
Here are some tips for choosing a good domain name:
- Use .com if possible. It’s the most memorable and most common extension. If the .com version isn’t available, choose a different domain name.
- Avoid punctuation (like hyphens) and numbers. Your domain should be easy to spell, pronounce, and remember.
- Keep it short. A good rule of thumb is to aim for 12 characters or less. The shorter it is, the easier people will remember.
- Make sure it’s easy to pronounce. Again, if it’s difficult to pronounce or doesn’t sound like it’s spelled, people might not remember it. You can test this by writing your domain down (or texting it to a few friends) and asking them to pronounce your domain the way they think it sounds. If most people get it right, then you’re probably good to go.
- Use free domain name generators if you get stuck. There are lots of good tools out there. Wordoid helps you generate unique, made-up words. Domain Wheel and Name Mesh find available domains in your niche.
While your domain name is important, don’t let it hold you back from getting started. It’s easy to spend too much time in the planning phase and get overwhelmed. But nine times out of ten, quick action wins out over careful calculation. If you find yourself getting stuck here, just choose a domain name you can live with and move on.
Choose your hosting service and plan.
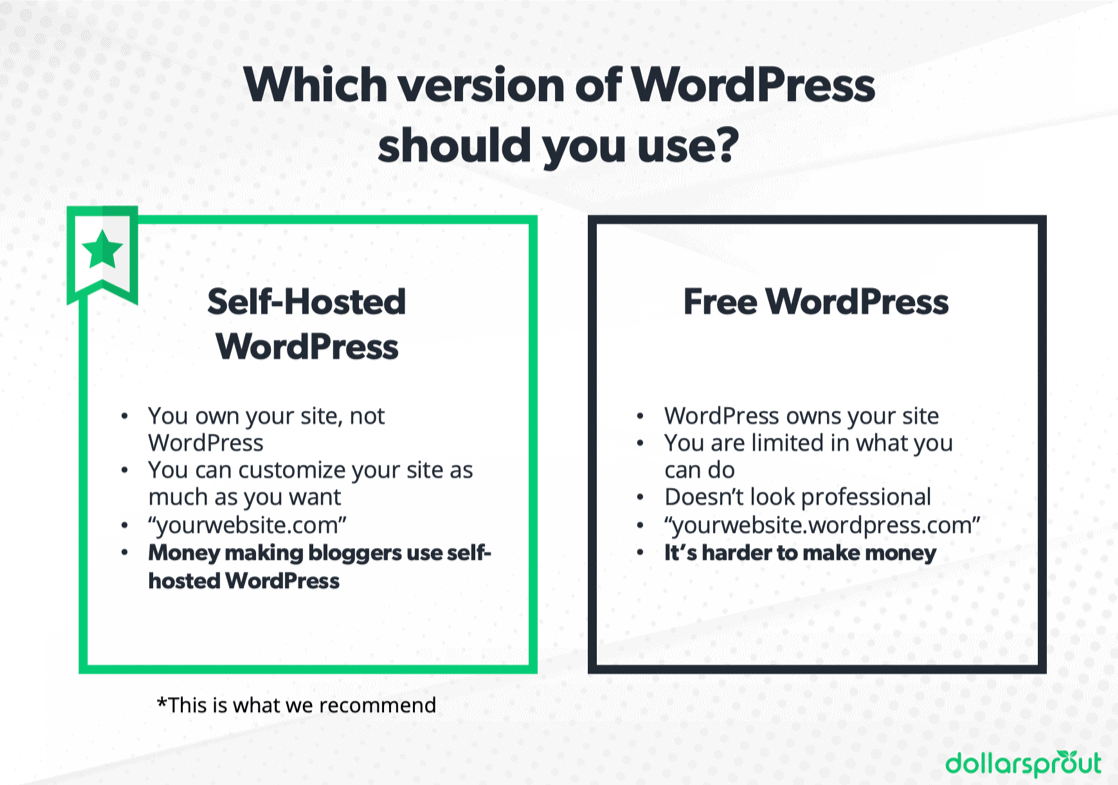
When you’re ready to start your blog and launch your site, you have a few different options. The main two platforms are WordPress.com (free) and WordPress.org (paid).
Free may seem like the way to go when you’re first starting out, but if your goal is to make money, you’ll want to choose WordPress.org with paid hosting (which you can get for a couple of dollars per month). WordPress.org gives you more freedom over your site, including your design, your content, and how you make money.
We recommend HostGator for hosting your website. They’re one of the best all-around hosting companies in terms of performance, they offer a free domain, and they’re super affordable for any new blogger.
2. Create a create a hosting account
Since HostGator is, in our opinion, the best hosting platform for new bloggers, we’re going to show you how to get your new blog set up with them in 10 minutes or less.
Step 1: Select a hosting plan
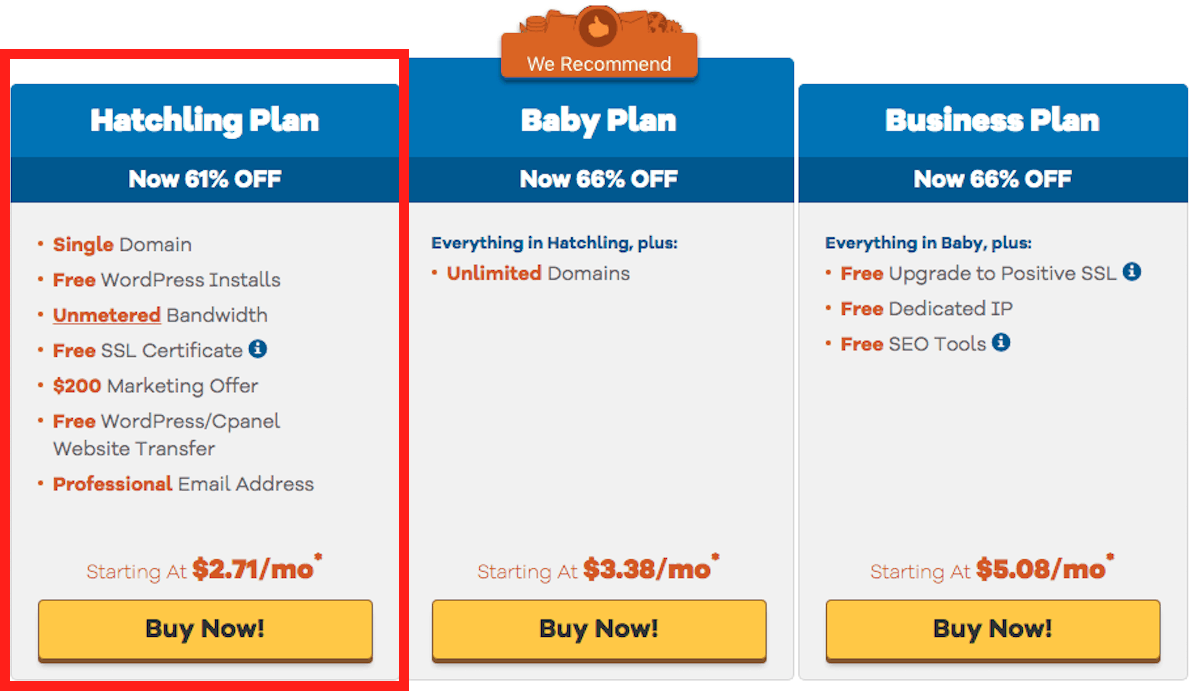
When you visit HostGator’s Get Started page, you should land on a page that has three hosting options to choose from (Hatchling, Baby, and Business).
Assuming this is your first website, there’s no need to go with anything other than the Hatchling Plan. It’s the cheapest plan and has more than enough resources for a brand new website.
Step 2: Choose your domain name
Once you hit the “Buy Now!” button, you’ll be directed to the order form. The first item on the list is the most important one: your domain name.
This is the one and only name for your website, so give this some thought.
It can be tricky coming up with a name that isn’t already claimed.
Tips for choosing your domain name:
- Stick to just .com endings. Don’t bother using .biz, .info, .org, or any other endings.
- Make your domain name simple and easy to remember.
- Leave out numbers, dashes, and anything else other than letters.
Step 3: Enter your hosting plan information
This step determines your approximate initial cost to start your blog. It should be noted that HostGator offers a 30-day money-back guarantee.
No matter how much you spend, if you end up deciding that blogging isn’t for you within the first 30 days, you can get your money back, no questions asked. (Hence why blogging is an amazing opportunity to start your own business at a relatively low cost, with zero risk involved.)
In order to lock in the biggest discount, I recommend taking advantage of one of HostGator’s 36-month hosting plans.
It greatly reduces the overall cost of your blog, and you can typically get prices lower than $3.00/month (even lower when they’re running special promotions).
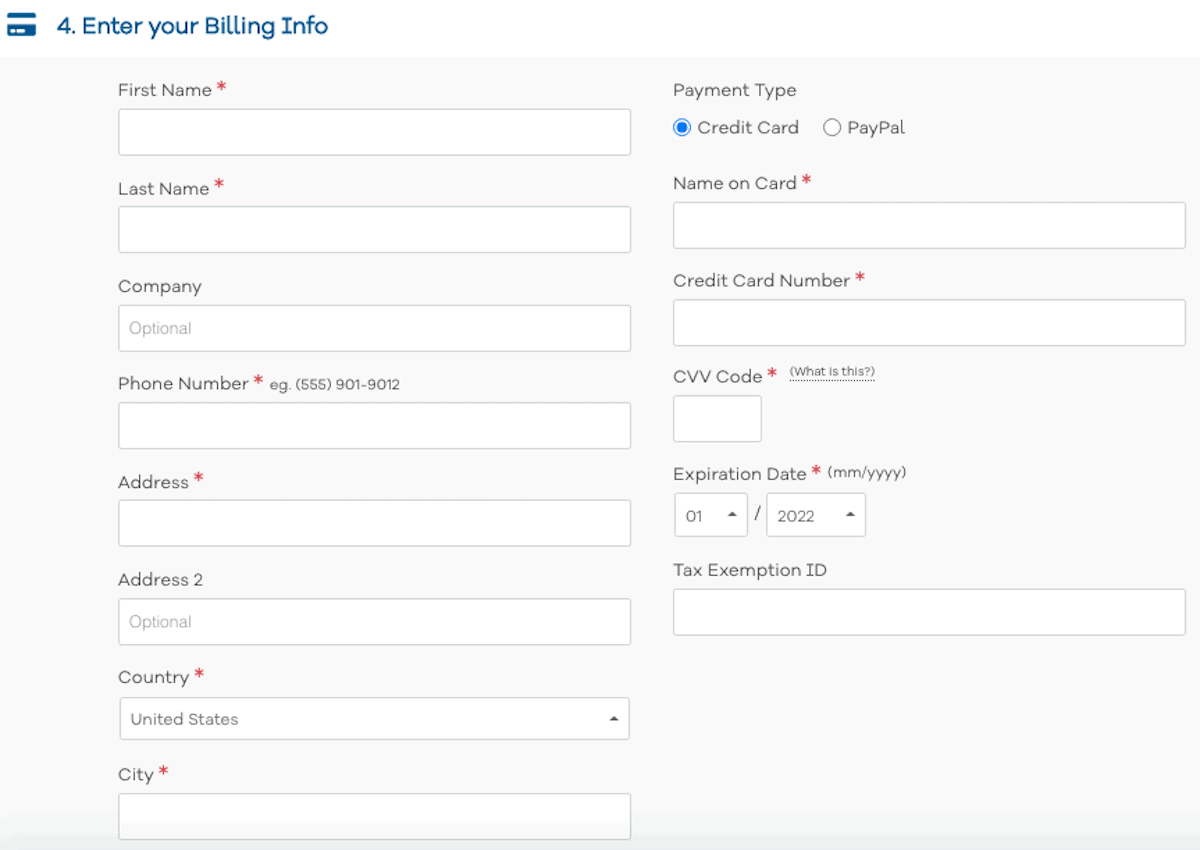
Step 4: Create your account and enter your billing information
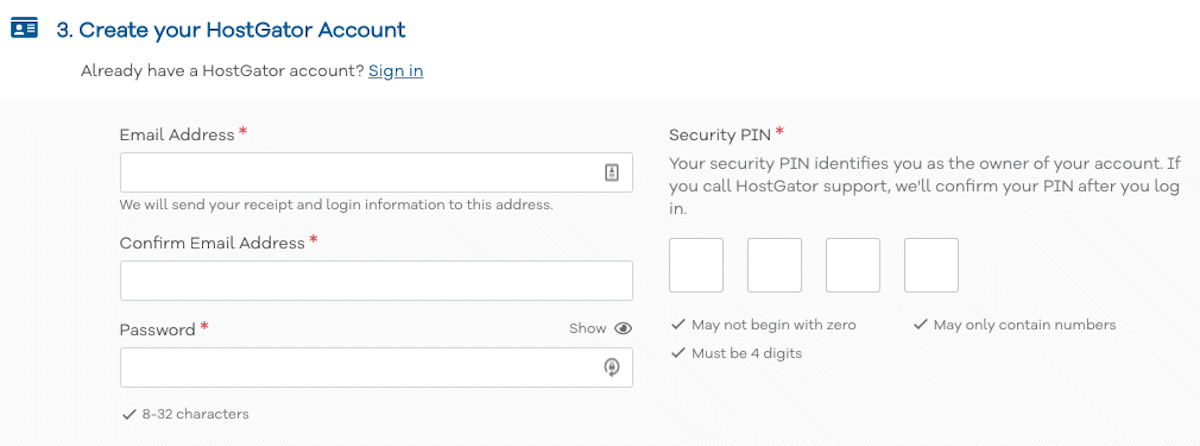
Next, you’ll need to create your HostGator account and set a security PIN. You’ll use this to access the back end of your website, so write it down or store it in a password tool like LastPass so you don’t forget.
Then comes your billing information, a pretty straightforward step.
Step 5: Choose add-ons that you want
Fortunately, most of the add-ons that HostGator offers are already included in the price of the package, including a free domain and SSL certificate (important for protecting your site visitors). However, there are a few add-ons to consider.
HostGator recommends adding SiteLock Essentials to your blog, but you don’t really need it. There are plenty of other free and paid WordPress plugins you can use to secure your site. We recommend starting with a free security plugin, like Wordfence. You can always upgrade to a paid solution later if you decide to.
The “SSL Certificate” add-on looks confusing. Your hosting plan already comes with a free SSL certificate, this is just a beefed-up option.
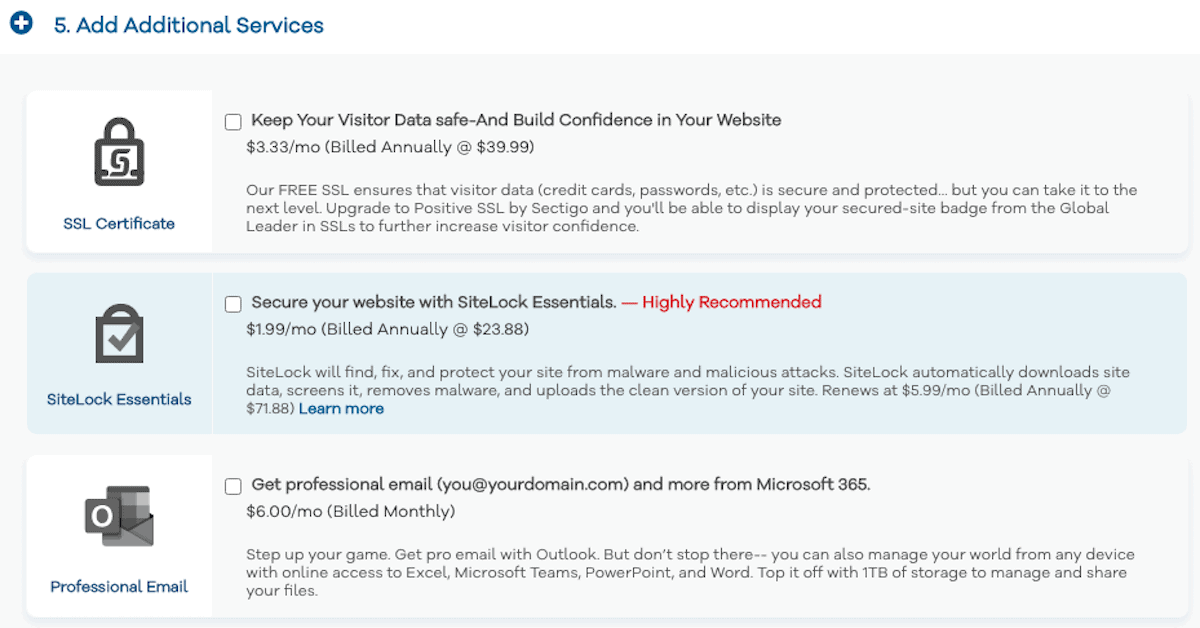
You can get by for now without any of the paid HostGator add-ons, so the next step is to…
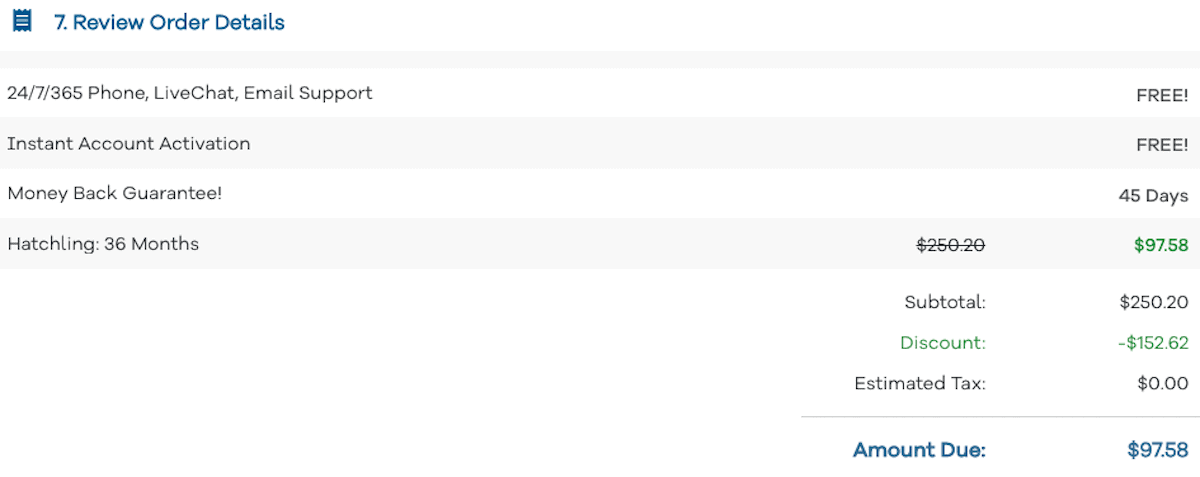
Step 6: Review order details and submit
Once you’ve completed all the steps above, go through and make sure everything is the way you want it.
Depending on the length of the hosting package you selected (1 to 36 months), your checkout price can vary greatly.
You’ll pay more upfront for the lengthiest hosting plan, but you’ll save 60% off the total cost of 3 years worth of blogging.
The 36-month plan will still give you the best price (three years of hosting for less than $100), and you can cancel within 30 days. But if you’re on the fence about blogging or don’t want to spend the money up front and decide to choose the monthly option, you’ll still get a hefty discount.
You’ll also notice that there are a few other free perks: 24/7/365 Phone, LiveChat, Email Support and, again, the 30-day money back guarantee if you decide blogging isn’t for you.
Once you’re all set, go ahead and hit “Checkout Now!” and let’s get rolling.
Step 7: Install WordPress
As far as blogging platforms go, WordPress is in rare company. In fact, WordPress sites now comprise more than 30%[1] of the entire Internet. You could go with a smaller platform like Tumblr or Blogger…or you can go with the content management system (CMS) chosen by:
- Spotify
- TechCrunch
- CBS
- NBC
If those sites use WordPress, I think its safe to say you’re choosing the right blogging platform.
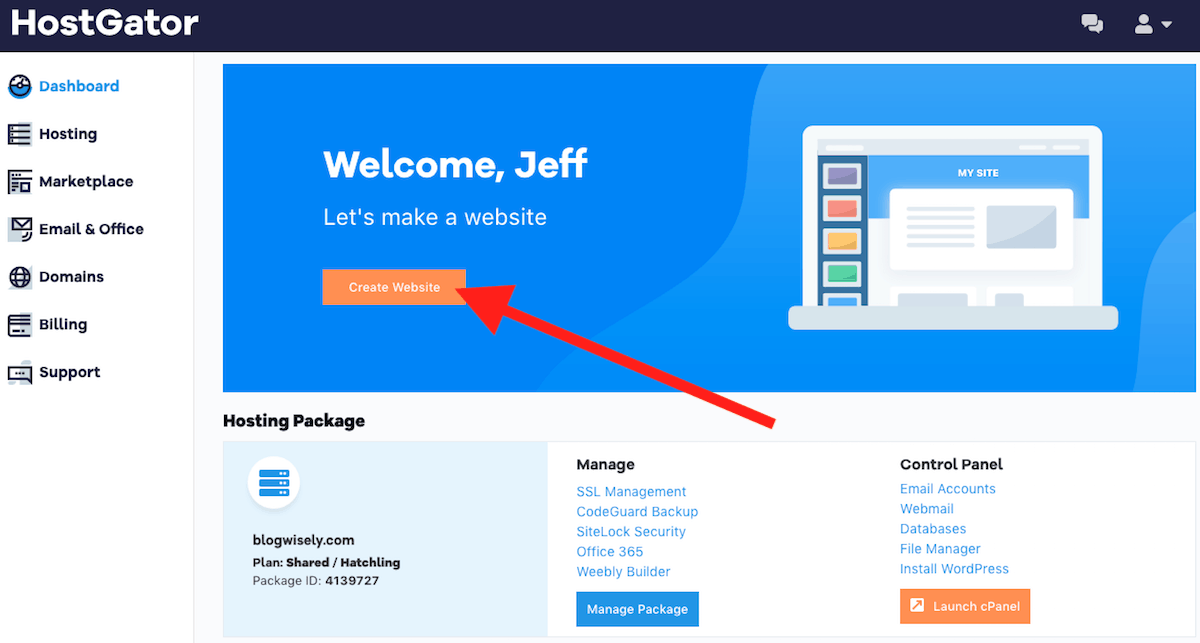
Using the username and password you created when you set up your account, you should see your dashboard when you log in. From there, click on Create Website.
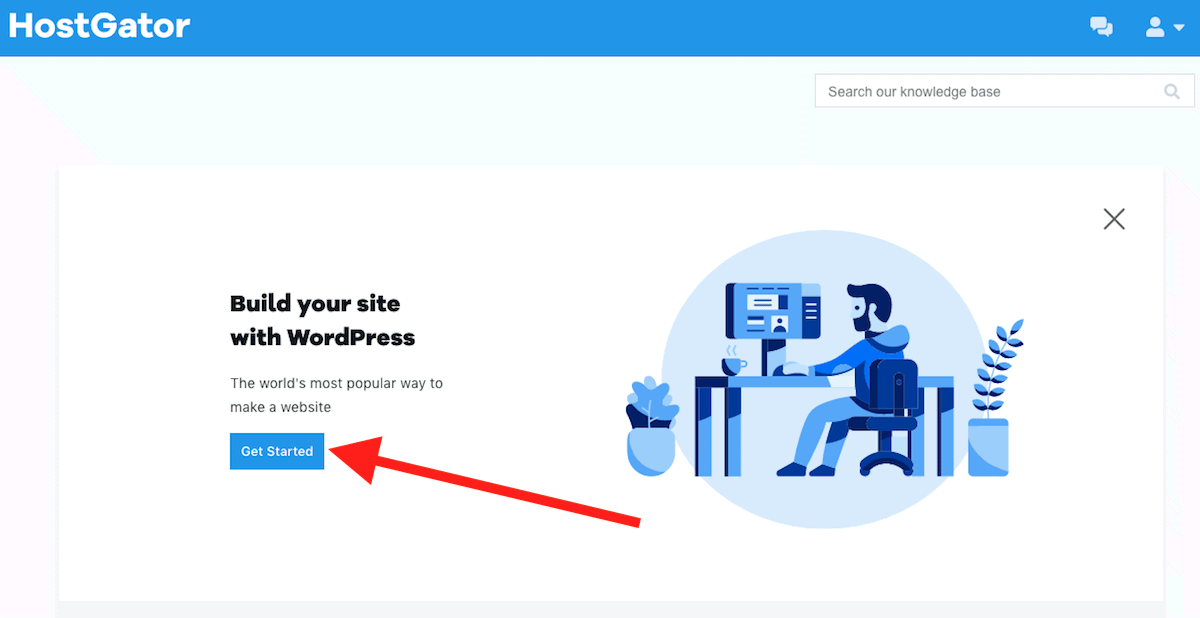
That will take you to a page where you can choose your blogging platform. At the top underneath “Build your site with WordPress,” click Get Started.
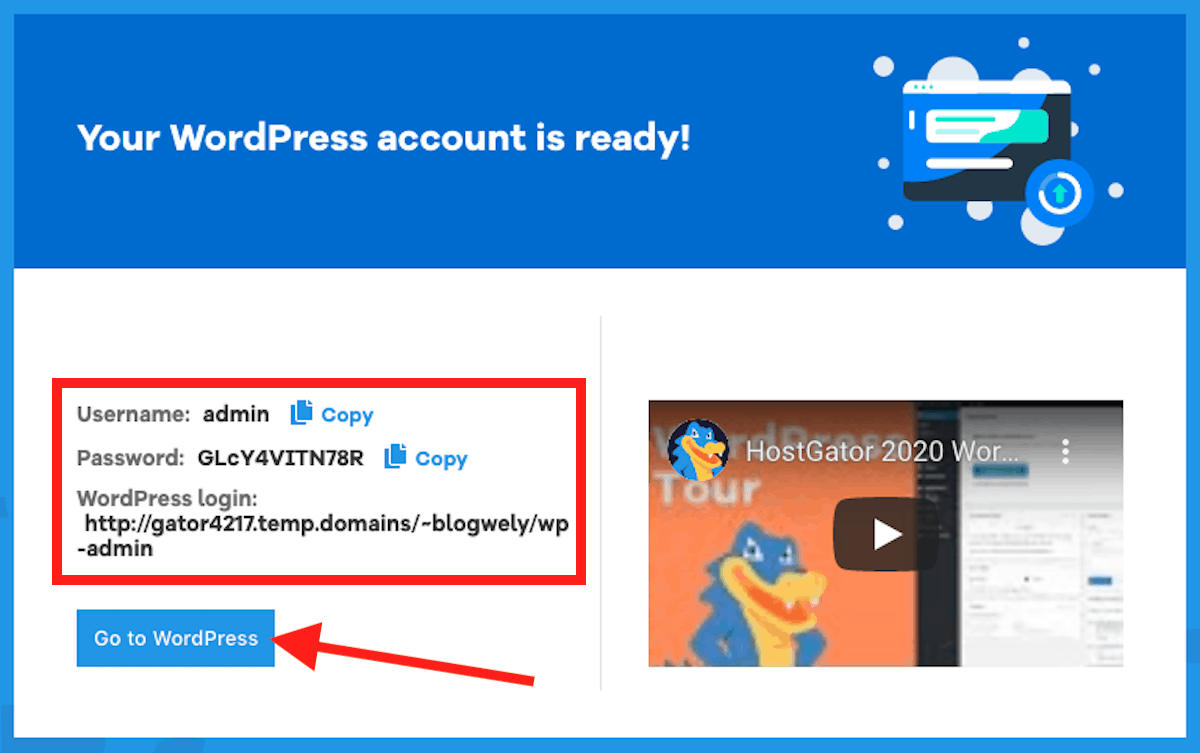
This next screen is very important. You’ll see the link to your WordPress login page, your username, and your password.
Write these down or copy them over into LastPass so you don’t lost them. Once that’s done, make sure to copy your password (you’ll need it on the next screen) and click Go to WordPress.
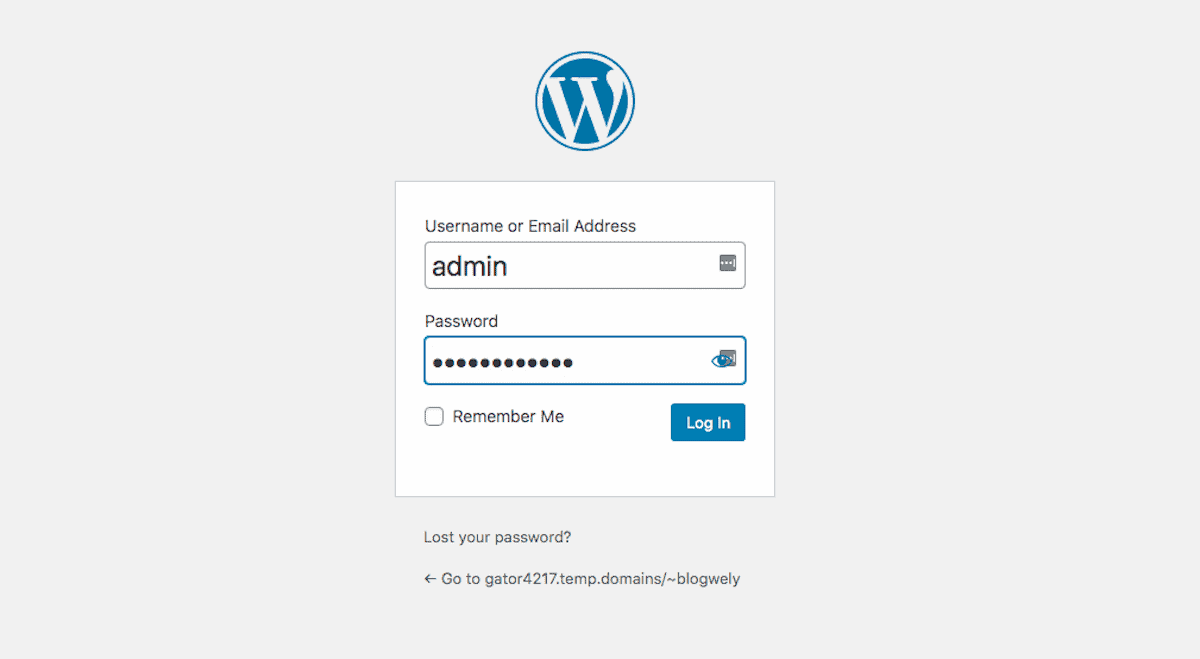
The next screen is your login page where you’ll use the username and password you just copied to log in to your site.
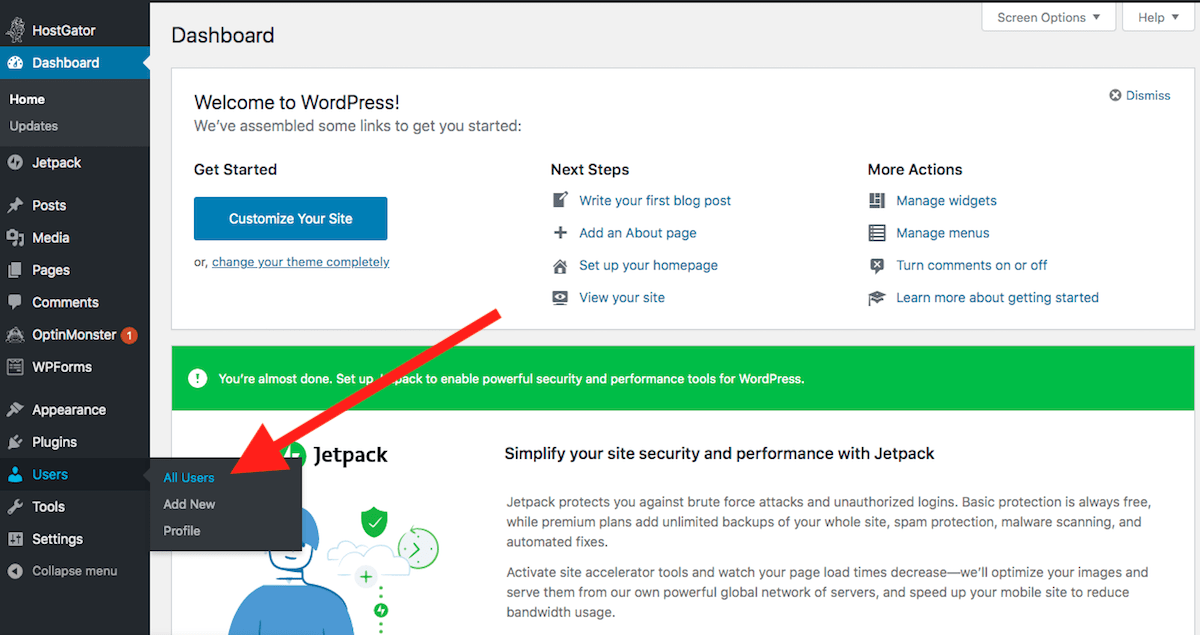
When you log in, the first thing you’ll see is your dashboard. Before you start setting up your blog, you’ll probably want to change your password to something you can remember. Hover over Users on the left side menu and select All Users.
Here, you can add new user accounts (if you want an account named something other than “admin”), but for now you can just update your current profile. Hover over the user name and click Edit.
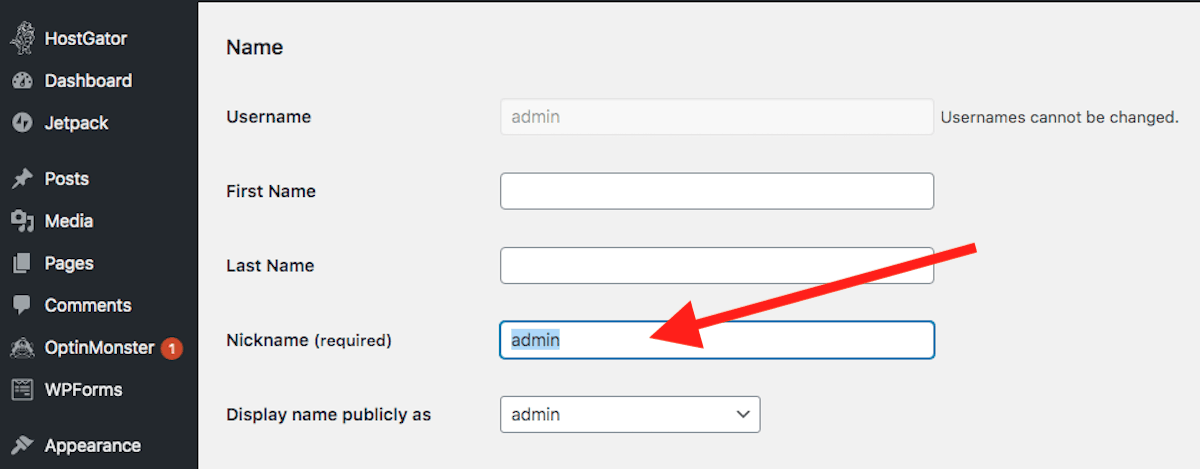
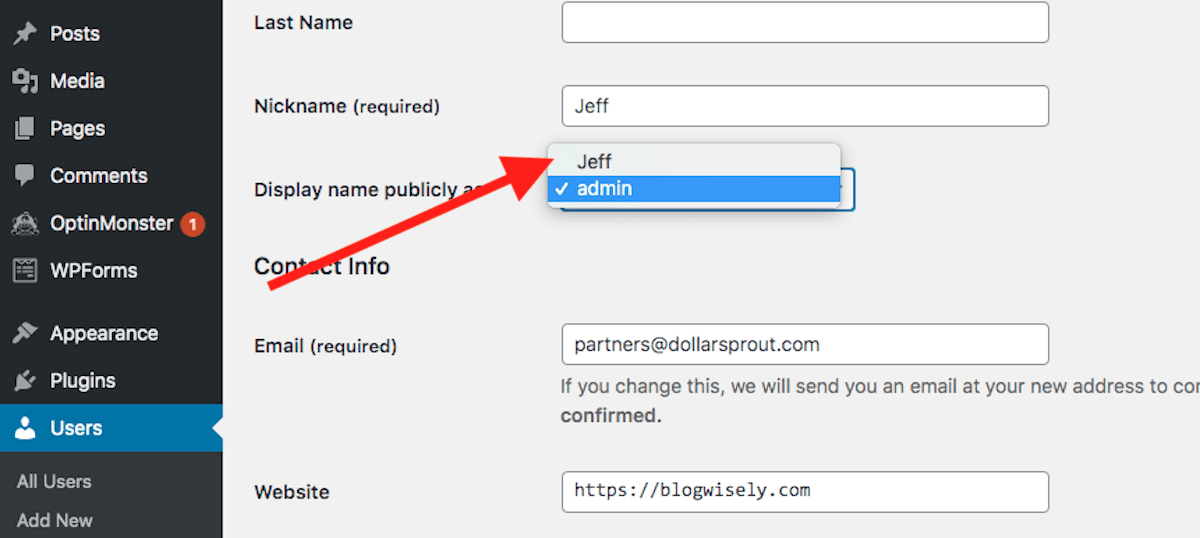
Then scroll down to the “Nickname” field. Add whatever name you want to appear publicly on your website here.
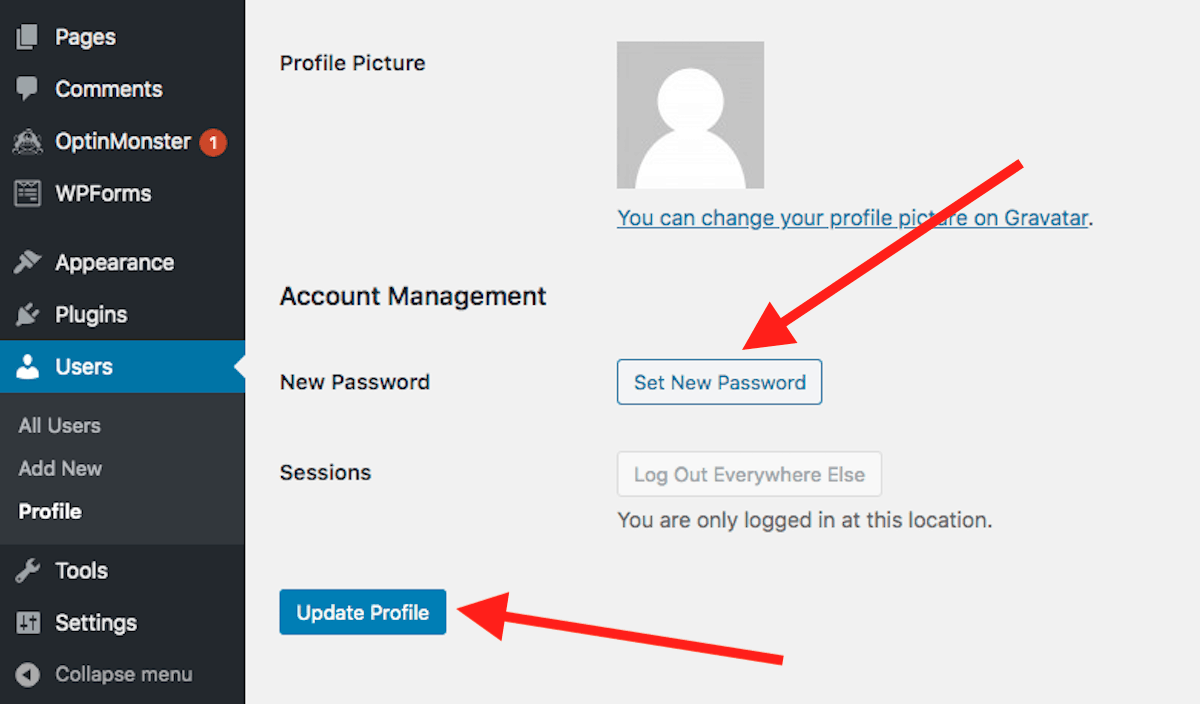
Scroll down a little further and click Set New Password. Choose something secure, but something you can easily remember. And don’t forget to update it in your notebook and LastPass. Once you’re finished, hit the Update Profile button to save your changes.
Almost finished. Scroll back up to the name section and find Display name publicly as. Click the dropdown to the right to choose the Nickname you set as your public author name.
Then scroll down and save your changes.
If you get logged out, you can sign back in to your WordPress site any time without going through HostGator. Just go to http://YOURWEBSITENAME.com/wp-admin/
Now that your site is all set up, it’s time to make it look nice (or at least good enough for now).
3. Design your blog.
WordPress themes allow you to design your blog without any coding or real technical knowledge. You can choose from one of WordPress’s free themes or upgrade to a paid theme.
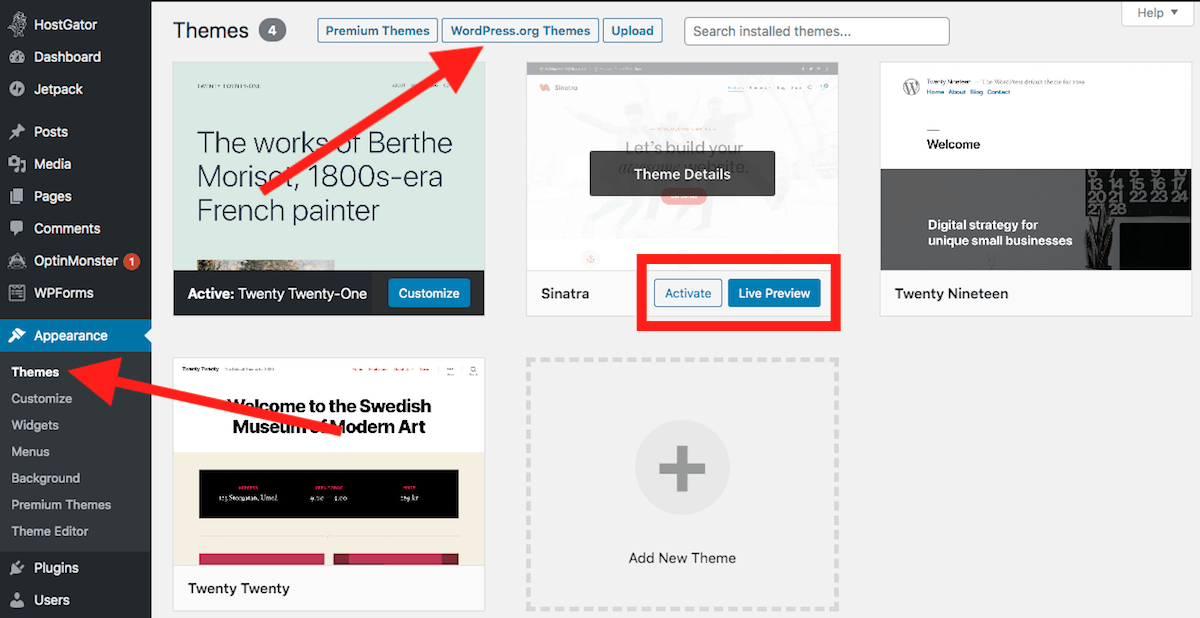
For free themes, go to Appearance > Themes. Here you’ll find the standard themes that come with your account. If you see one you like, click Activate to apply it to your blog or Live Preview to see what it would look like on your site.
If you don’t see anything you like, click on WordPress.org Themes at the top of your screen to view more free theme options.
Free WordPress themes are a great option for new bloggers. However, they come with a few drawbacks:
- Limited (or no) developer support
- Lack features and functionality
- No warranty (if something goes wrong or breaks, you’re on your own)
Paid WordPress themes often come with all of those features, plus the added benefit that you can customize your site and make it look exactly how you want it.
We’ve used and recommend StudioPress themes for beginner bloggers. All of StudioPress’s themes are search engine optimized, mobile responsive, and come with unlimited updates and one year of unlimited support. So if you have trouble customizing your theme, you can reach out to the StudioPress team and they’ll walk you through everything.
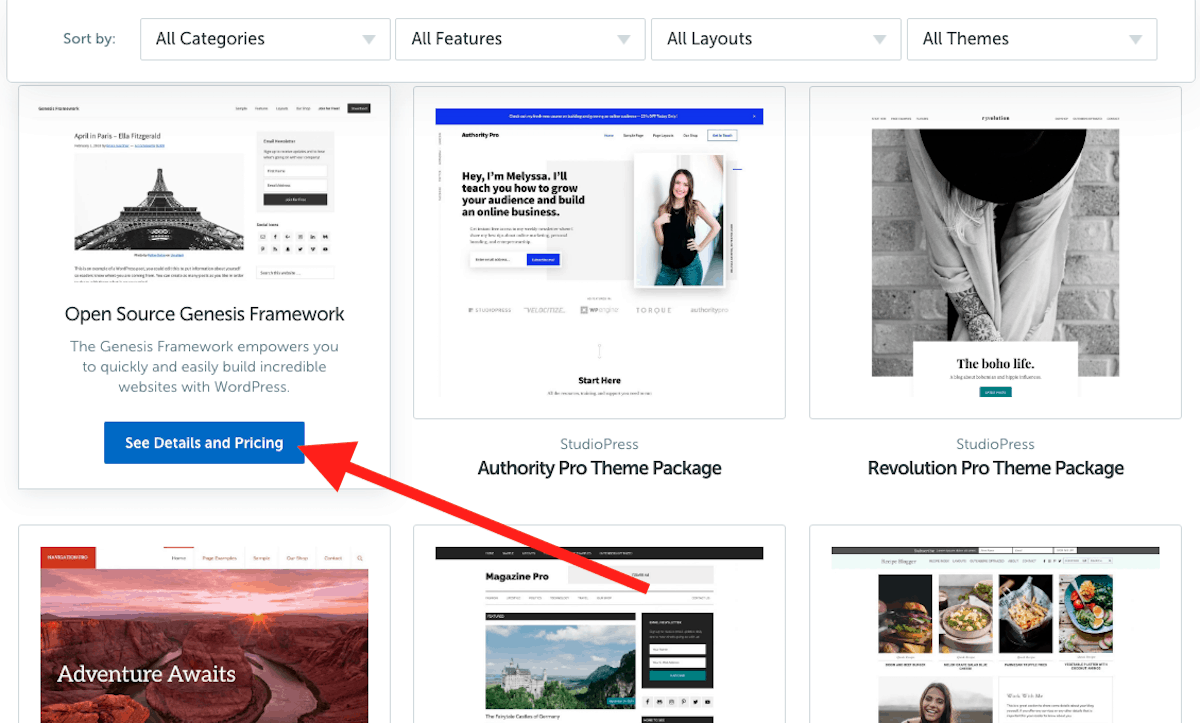
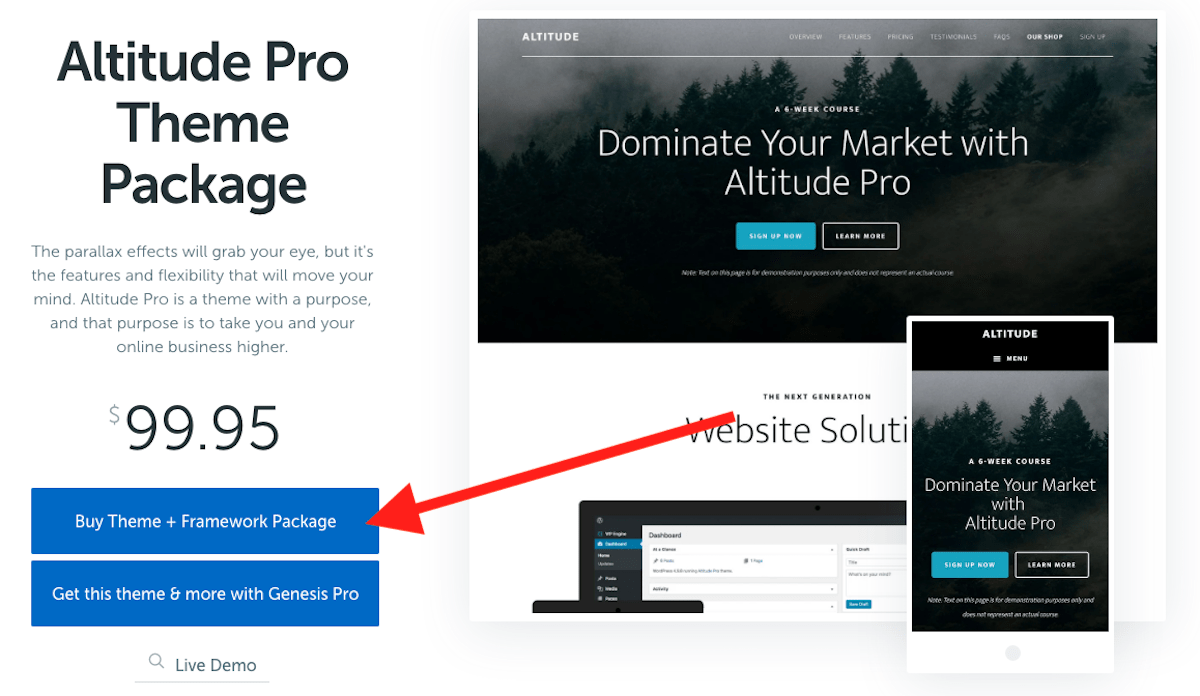
You can check out StudioPress’s Genesis themes here. When you find one you like, hover over the theme and click See Details and Pricing. (I’m going to use the Altitude Pro theme for this tutorial since it’s one we’ve already purcahsed.)
On the theme page, choose Buy Theme + Framework Package and check out.
The checkout page will prompt you to create an account by entering an email and password. Once you pay, you’ll automatically be logged in to your account.
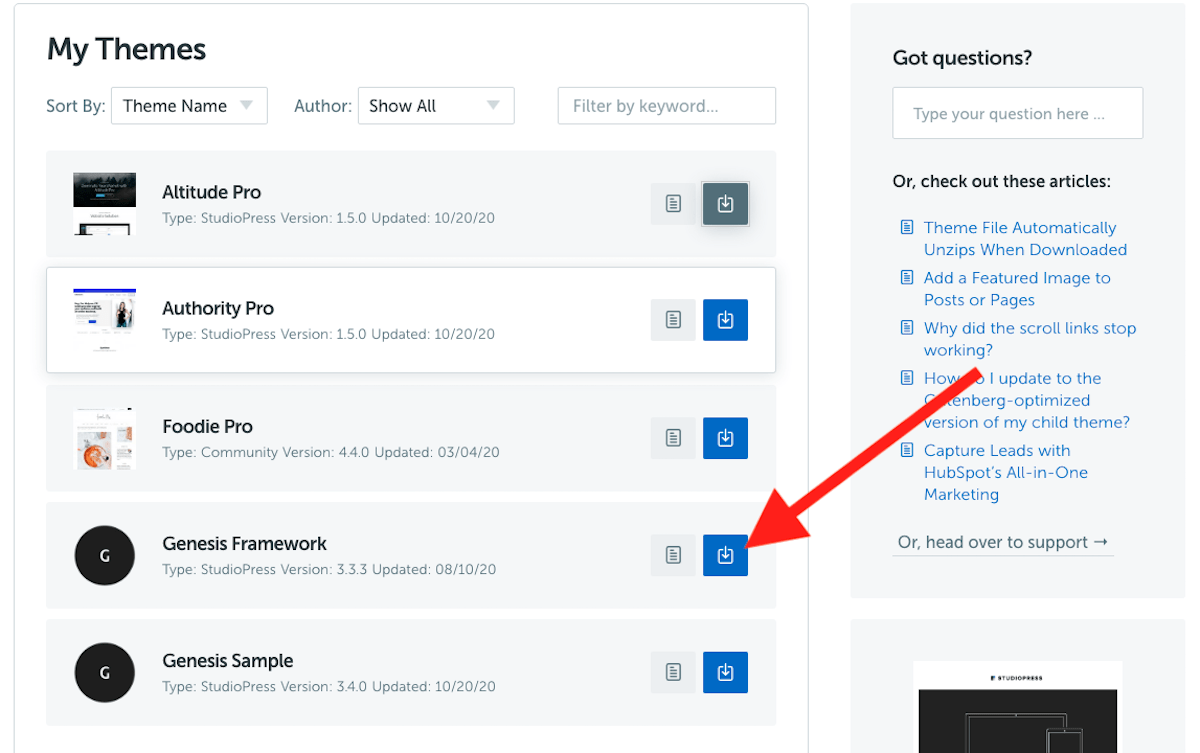
As soon as you log in to your account, you’ll see your themes. Click the blue button next to your theme to download it. Save the file to your desktop or somewhere you can easily find it. (You can delete it from your computer after you upload your theme to WordPress.)
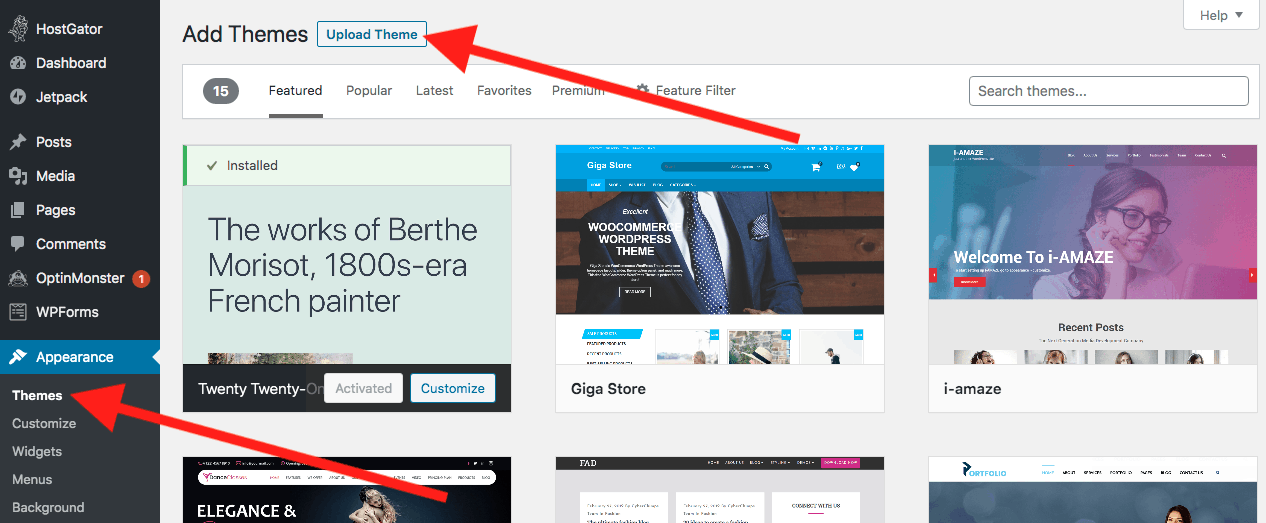
For the next step, go back to your WordPress account. Under Appearance > Themes, at the top of your screen, click Upload Theme.
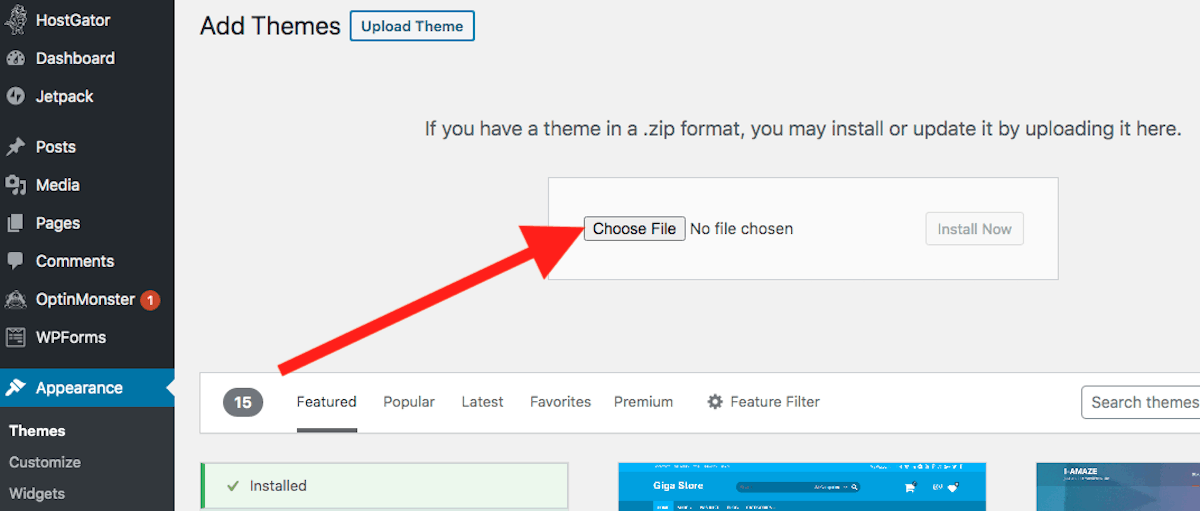
On the dropdown that appears, click Choose File.
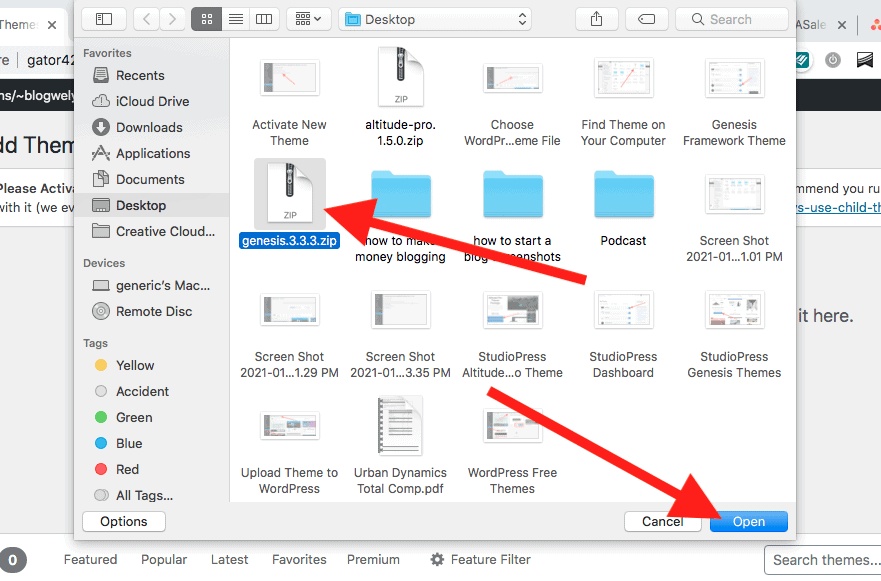
Find where you saved your theme on your computer and select Open. (If you can’t find it, look in your downloads folder.)
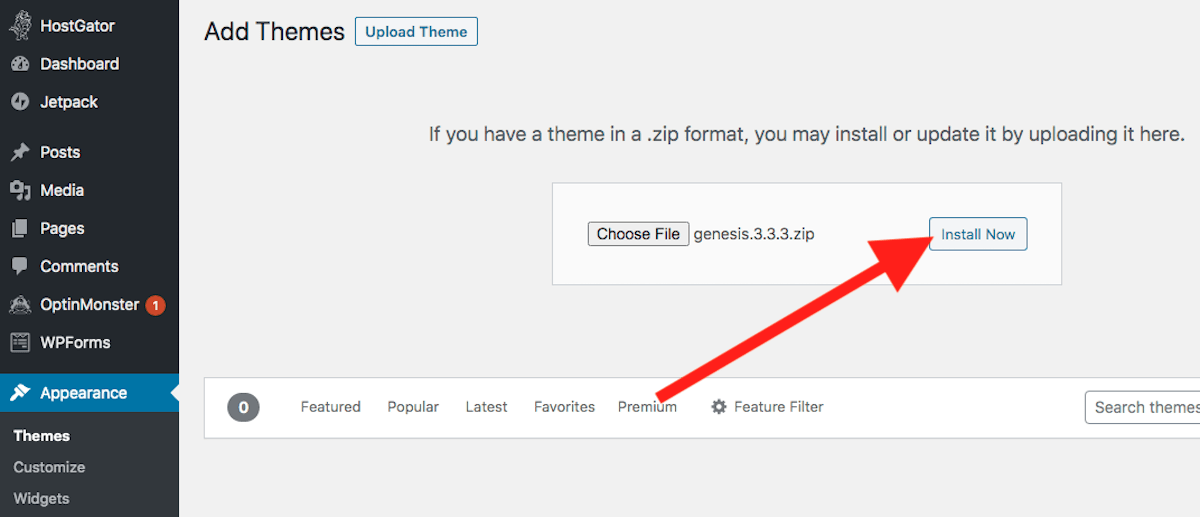
Then click Install Now to upload your theme.
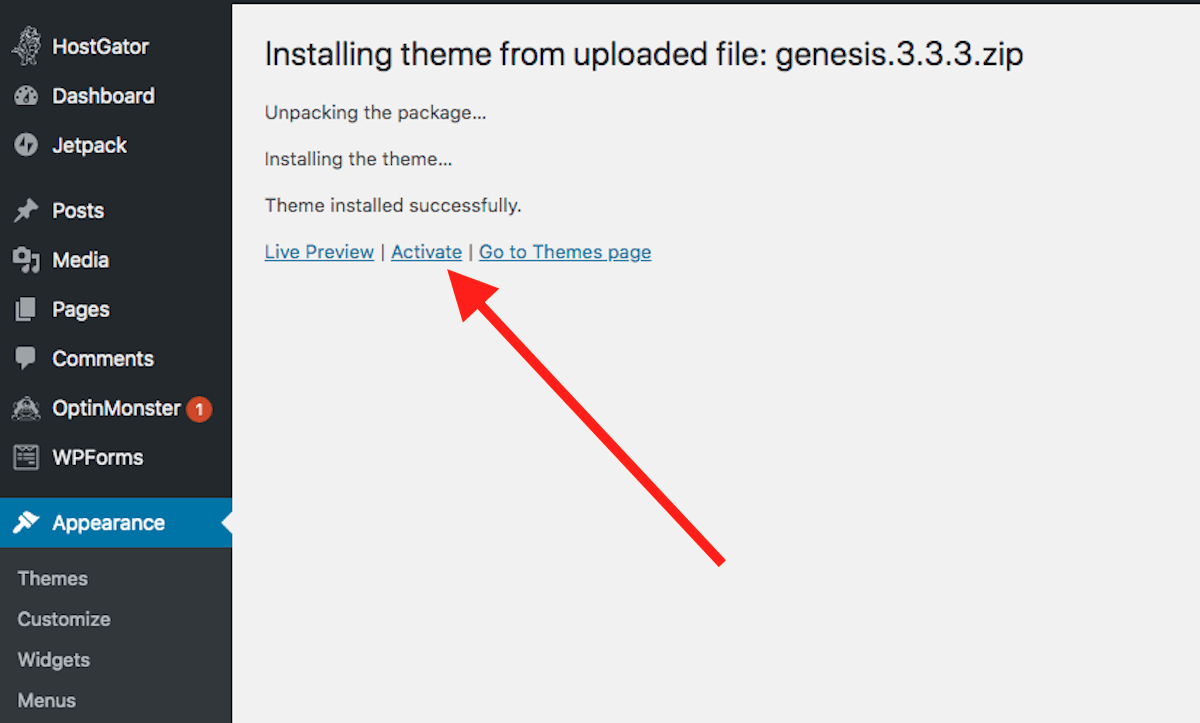
Once your theme is uploaded, click Activate.
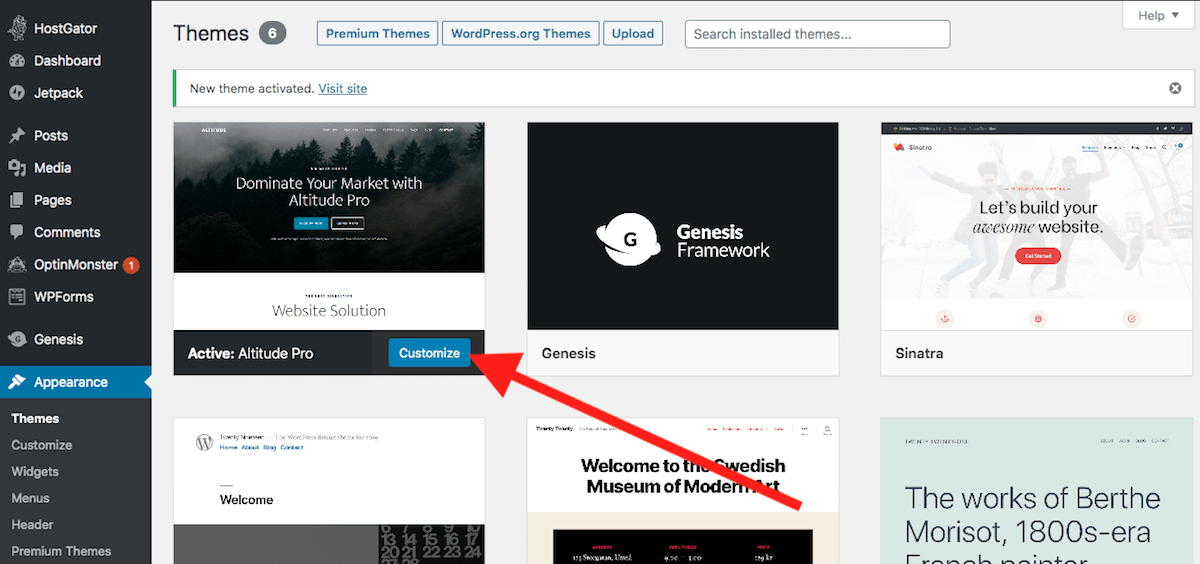
This will take you back to your themes page where you can see that the Genesis Framework is now active. Follow the exact same process to install your child theme (in this case, we’re using Altitude Pro). Download from StudioPress, upload to WordPress, and activate.
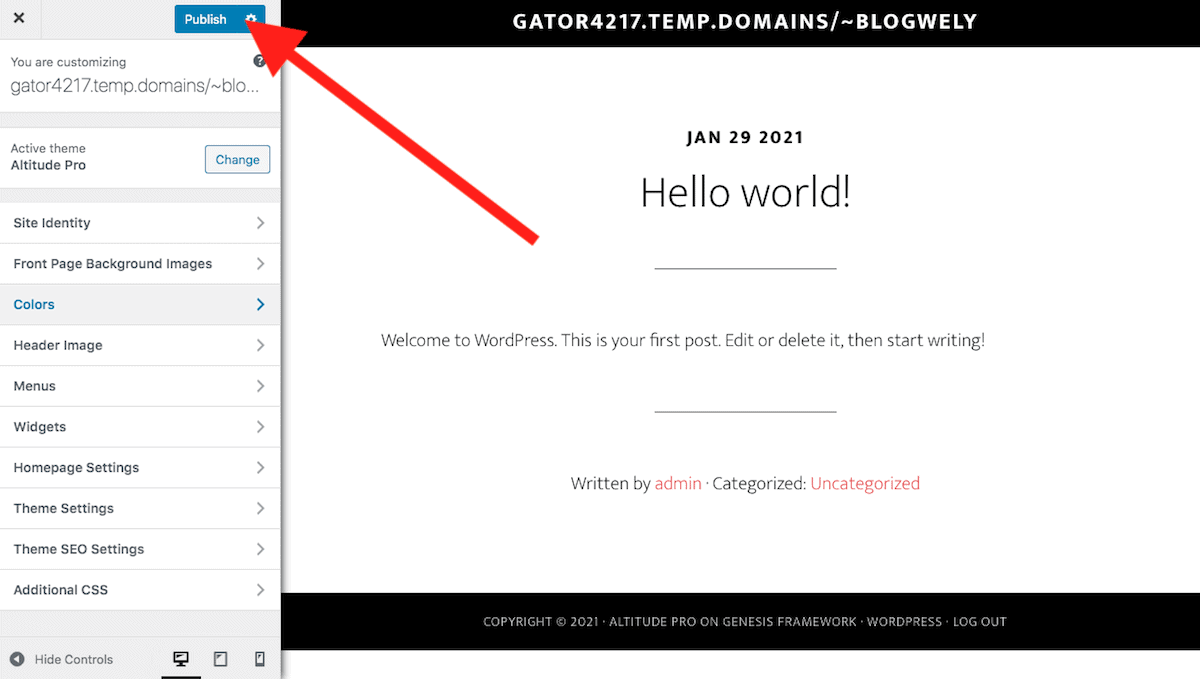
Once both themes are active and you’re back on your themes page, hover over your child theme and click Customize.
From this page, you can view your site live while making changes to things like your site colors, menu, and other theme settings. Hit Publish at the top of the left menu to save any changes you make.
We’re not going to walk through customizing your theme in this tutorial because every theme is different. However, StudioPress themes are widely used, and there are many resources available for each theme.
StudioPress also includes setup instructions. In your account, you can click on the gray button (next to the blue button you used to download your theme earlier) to read their guide. You can also just search for “studiopress [YOUR THEME NAME] tutorial” on YouTube or Google and find videos on how to customize every element of your site.
Speaking from experience, it’s easy to get into the weeds on the design of your new site. However, you really don’t need to customize that much at this point. Change your site colors and poke around in the theme settings for a few to familiarize yourself with everything.
Then move on to the next step.
4. Optimize your blog.
Plugins add new functionality to your website, like the ability to create a contact form or back up your website with the click of a button. With the thousands of plugins available, it’s easy to get lost in the mix. But as a new blogger, you don’t need every plugin out there.
Start with these five free plugins and tools to help get your content seen, shared, and start building an audience.
1. Set up your email, use it to create a Google account, and set up Google Search Console.
Google Search Console isn’t a plugin. It’s a free tool from Google that allows you to see how your site is performing in search results, what other sites are linking to yours, and what keywords your content ranks for. This is important information to have to improve your search engine optimization (SEO) and get your content in front of more people.
The tutorial below includes how to set up an email account with your domain in it using HostGator (if that’s your chosen hosting provider), how to use your new email to create a Google account, and how to use your new Google account to set up Search Console.
2. Connect Google Analytics with the MonsterInsights plugin.
Search Console is all about your site’s SEO, while Google Analytics is about your audience. You’l use this tool to track who’s coming to your site (demographics), how long they’re reading your content, which blog posts are the most popular (pageviews), and how many pages users visit when they come to your site.
This information can help you better understand your readers and improve your content. The tutorial below shows how to set up your Google Analytics account and connect it to your site using the MonsterInsights plugin for WordPress.
3. Optimize your content with Yoast SEO.
Now that you can ready your SEO data with Search Console and Analytics, the next step is to optimize your content so it appears in search results. Yoast provides a checklist of items for each blog post, like making sure you have keywords in prominent places (titles and headings), include internal and external link, and write compelling meta description. You can also use Yoast to create a sitemap for your blog.
Here’s how to set up Yoast for your site:
4. Make your content shareable with Grow by Mediavine.
The most important (and often most challenging) part of monetizing a blog is actually getting your content in font of people. That’s why you want to make it as easy as possible for readers to share your content with others.
The Grow plugin adds sharing icons to your site so that users can share to Facebook, Pinterest, LinkedIn, and other social media platforms in just a couple of clicks. Watch the tutorial below to set up the free Grow plugin for your new blog.
5. Increase your site speed using ShortPixel.
Websites today load at lightning speed. We’ve become so conditioned to this quick delivery of information that if your site doesn’t keep up, users are more likely to leave. Image files can have a huge tax on your site’s load time. But with the free ShortPixel plugin, images are automatically compressed when uploaded, meaning smaller file size and a speedier website.
5. Write your first blog post.
Once your blog is set up, we can finally get to the exciting part (and the part that makes you money): writing and publishing content.
The difference between starting a blog as a hobby and starting one to make money is that you can’t just write about whatever you want or think or feel. You have to be intentional about the topics you choose, how you structure your articles, and optimizing your content for traffic and conversions.
But before you even put fingers to keyboard, you need to figure out how you plan to make money.
Decide on a monetization strategy.
If your goal with starting a blog is to make money, then each article you publish should have a purpose. For example:
- Selling your own products
- Advertising for other companies (i.e. display ads)
- Sending readers to affiliate products (i.e. companies you work with that pay you money for sending them new customers)
- Capturing easy organic traffic to get their attention and send them to a monetized article.
If you don’t have a strategy behind an article, then what happens if it blows up or goes viral on Pinterest and you get a ton of traffic? You may gain some new email subscribers or readers, but your bank account won’t notice the difference.
One of the easiest ways to make money blogging as a beginner is through affiliate marketing, and the one we recommend starting with. As an affiliate marketer, you’re the middleman between companies and their potential customers. Your goal is to match a company’s products and services with people who could benefit from them.
You can find relevant products in services in your niche by signing up for affiliate networks. These networks offer programs from many different companies in the same place so you don’t have to sign up for them individually. (Oftentimes the program is only offered through a network, so you couldn’t sign up for it individually if you wanted to.)
If you already have some tools in your niche that you use and love, then you can Google “[product name] affiliate program” to find out if they work with affiliates.
If your goal is to eventually create your own products, affiliate marketing can help you determine what types of products and services sell the best among your audience.
Sign up for a few affiliate programs in your niche, ideally for products you use, like, and would recommend to others. Starting with monetization in mind, you can use your affiliate programs to determine what articles you write first.
Choose a topic idea.
Now that you’re signed up for some affiliate programs, the next step is to brainstorm a list of article topics.
Some of the best affiliate-focused types of articles are:
- How to/instructional (that’s what the article you’re reading is)
- Listicle (e.g. top 10 best ____)
- Reviews, comparisons, and alternatives
Take a minute to brainstorm some article ideas based on the affiliates you’ve come up with.
Once you have a list of 5-10 blog post ideas, keyword research will help you identify any low-hanging fruit — i.e. keywords with decent search volume and low competition that you might be able to rank for relatively quickly.
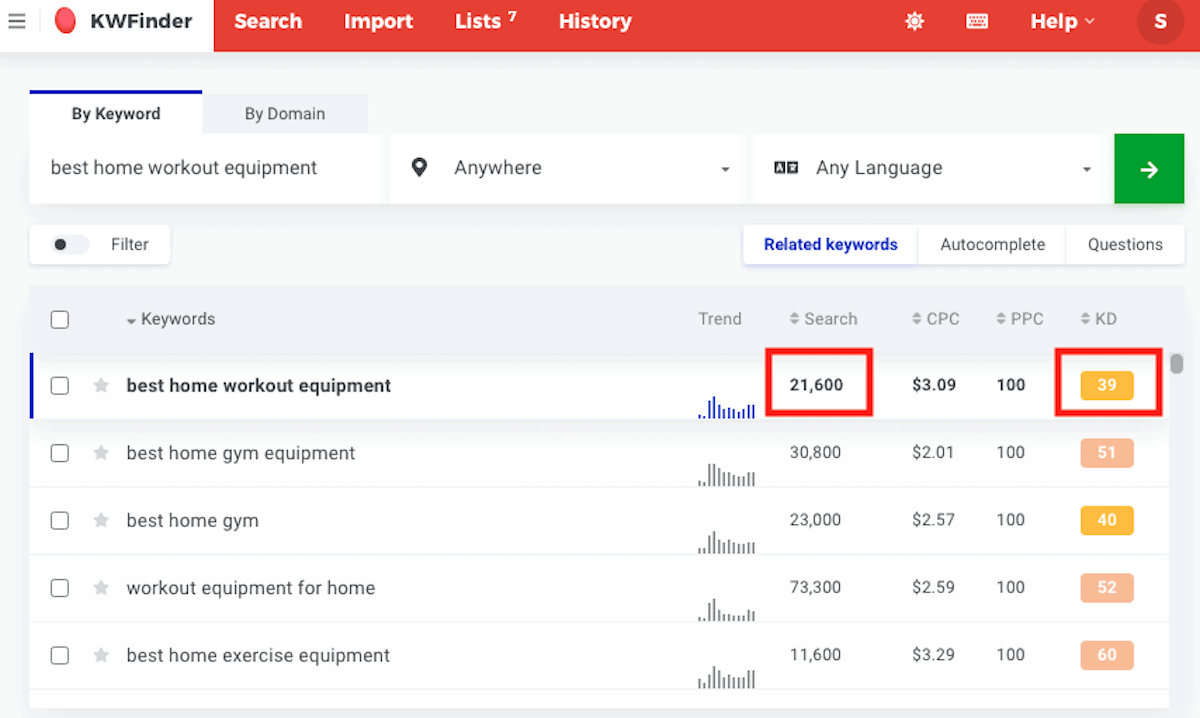
Let’s say your blog is about losing weight from home and you’re now an affiliate for some companies that offer home gym equipment. One of the ideas on your brainstorming list might be “best home workout equipment.”
Using KWFinder, you can find the monthly search volume for this term is high at 21,600, but the difficulty level of 39 is also higher than what a new blog can probably rank for.
Note: KWFinder is a paid tool with plans starting at $49/month ($359/year if paid annually). They offer a free 10-day trial for new users.
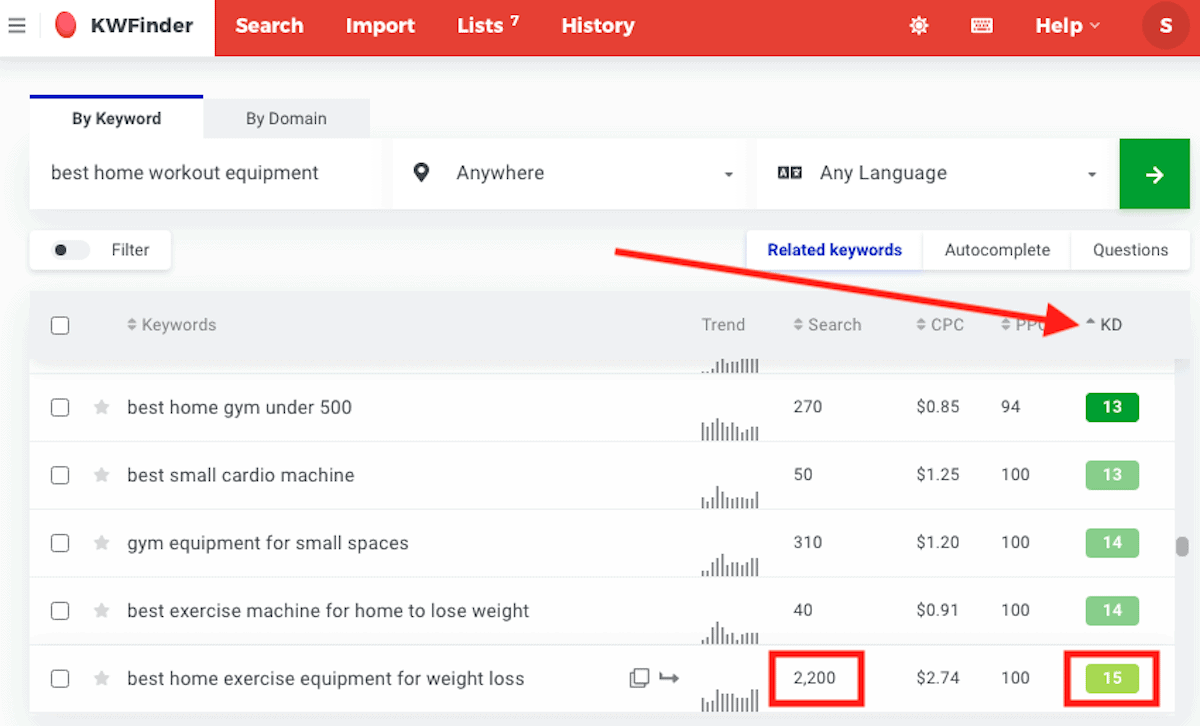
You want to find similar keywords that are relevant for your audience but that your site might actually be able to rank for in a short period of time. So click on the Keyword Difficulty (KD) column to sort from lowest to highest difficulty.
Here we can see that the term “best home exercise equipment for weight loss” has good search volume (over 1,000/month) and a low difficulty score of 15, making it a great candidate for your new blog.
This would fall under the listicle category of the types of articles we looked at above. Once you’ve written this piece, you can expand your affiliate content by publishing:
- An in-depth review on each item in your listicle
- Comparisons of some of the popular types of home workout equipment
- An article on how to lose weight at home (of course linking to your “best home workout equipment”)
Outline and write your first blog post.
It may not seem necessary at first, but outlining your article before writing is crucial. It’ll help you:
- Write faster because you don’t have to stop to research every section.
- Understand search intent for your keyword so you include all the information your reader wants and needs.
- Organize your article in a way that makes sense rather than rambling and jumping around.
You can create your outline in a Google Doc or directly in your WordPress draft. I prefer to create mine in WordPress so once you’re finished researching and taking notes, all you have to do is fill it in with your content.
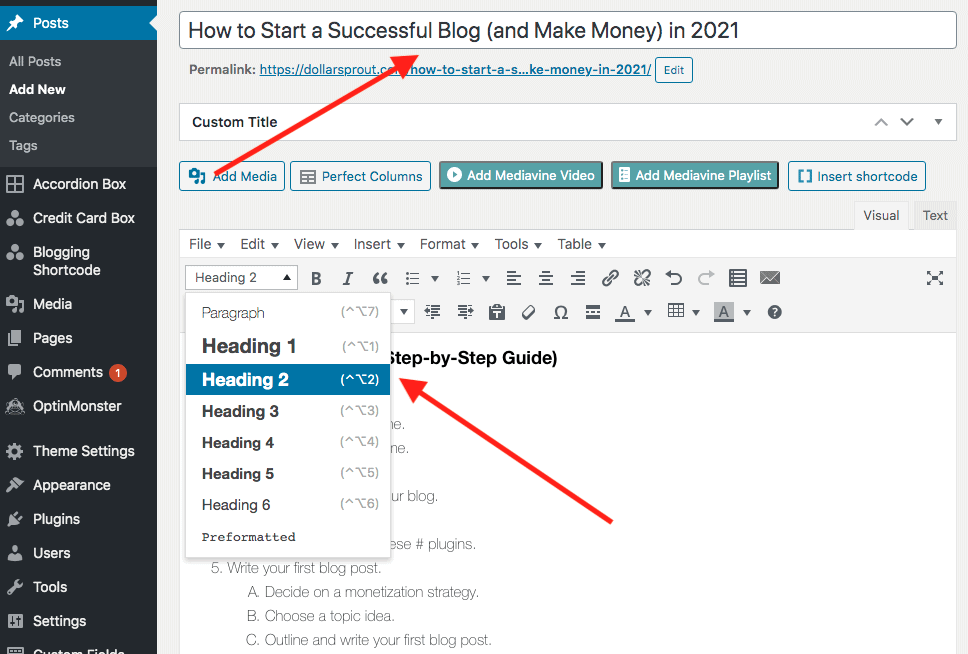
In your WordPress Dashboard, navigate to Posts > Add new.
Here you can do a brain dump and collect all your research in one place. I like to do a rough outline with a bulleted list, then go back and add my notes and research under each header to guide me as I write.
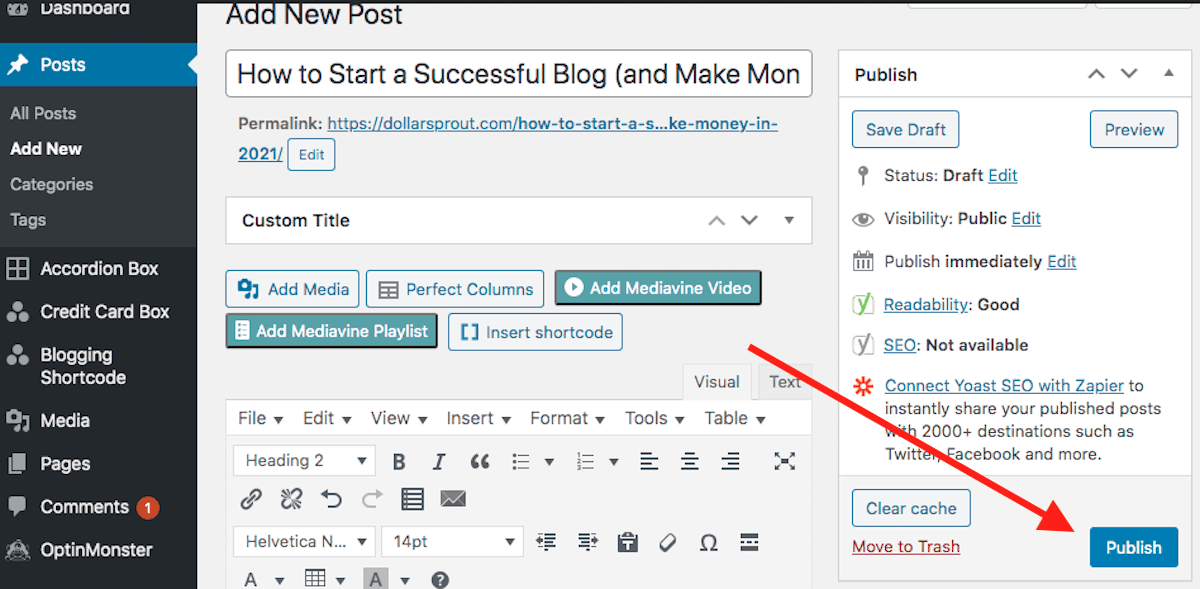
After you finish writing, you’re almost ready to hit publish.
Polish and publish your article.
The last step before publishing your article is to fine-tune your content. I highly recommend creating a blog post checklist to use for each article. This will help keep your content consistent and make publishing easier and faster. A few items to consider for your checklist:
- Ensure keywords are used throughout the article (headers and body). (This will help improve your blog SEO and get your content seen by more people.
- Add affiliate links.
- Insert a featured photo and high-quality images throughout.
- Make and add social media graphics.
- Schedule social media posts.
And that’s it! Once you’ve marked all the items off your checklist, you can publish your new article and start driving traffic to it.
4 Tips for New Bloggers
If you decide that the pros of blogging outweigh the cons and you’re ready to start your blog, here are a few tips to keep in mind as a new blogger.
1. Research your audience.
Everything becomes easier when you research your audience. The better you know your audience — their problems, fears, questions, desires — the better you can help solve their problems. And when you’re blogging to make money, it’s all about finding and helping your ideal reader.
Join Facebook groups, read subreddits and Quora questions in your niche, and if possible, schedule phone calls with people who fit your ideal reader description to find out what they’re struggling with and what types of resources they’re interested in. This will give you a backlog of content topics as well as ideas for your own products or services.
2. Focus on traffic in the beginning.
Many new bloggers think they need to wait until they have a certain number of articles published before they even begin thinking about traffic. Not if you plan to make money.
In order to make money, you need people coming to your site. Whether you have ten articles or five or even just one, it’s never too early to start growing your blog traffic. The sooner you do, the sooner you’ll get feedback on your content and learn what works and what doesn’t.
3. Write with personality.
No matter what niche you choose, chances are there’s someone out there who’s written about your topic before. Maybe even lots of people.
That doesn’t mean you shouldn’t start a blog on that topic or that you can’t make money. What it means is that you need to find some way to stand out. One of the easiest ways to do that is to infuse your personality into your writing.
Writing with personality will make your content more relatable, engaging, and help build trust with your readers. You’ll develop your writing style the more you write and publish content.
4. Let go of perfectionism.
Perhaps the most important tip I could give any blogger is to stop waiting until something is “perfect” to move forward. Your content will probably suck in the beginning. That’s the point.
If you wait to get every article perfect before you publish it, you deprive yourself of the opportunity for learning and growth. You can always go back and make changes later. Done gets results. Perfectionism creates paralysis.


